The many ways to move & peel a log while building a log home.
If you’re going to be doing any building with logs you will find out very quickly that some specialty tools can make the job much easier.
Moving materials can be an early and ongoing challenge for both DIYers and Professionals. Here are a couple of helpful tools.


A peavey (shown to the left ) is used to roll and position logs. It allows you to grasp logs of a wide range of diameters and move them. Trying to maneuver logs without such a tool can be extremely strenuous. A similar tool with more of a claw foot, rather than the point is called a Cant Hook. (shown to the right).
The many ways to peel a log
Transforming a pile of raw logs covered with bark into material that is ready to scribe cut and stack can be approached several ways. Your choice will be based on how much time you have how you want the end result to look and when the wood was cut.

The most common method is to use a peeling spud and drawknife combination. A peeling spud (sometimes called a debarking spud), is a tool that removes the bulk of the bark by prying it off. This works best on non-winter cut wood. In log building a peeling spud is used to knock off the majority of a log’s bark.
Once the bark is removed it’s on to the final cleanup...
Although many professional log peelers use only a drawknife , some use a chainsaw and/or grinder for taking down the knots. Using these tools before you begin to use the drawknife will save you time and energy in the long run and save sharpening time on your drawknife.

A drawknife is often used to finish the job before the log is ready to cut. Drawknives come in a wide range of sizes. Several different handle angles are also available because to date no one handle-to-blade angle has been satisfactory for all people. Overall weight of the drawknife can be a consideration for many people. Professional log peelers (yes there is such a profession and more physically fit group of folks would be hard to find) lean toward heavier drawknives. Some prefer the hand forged Barr drawknife which is easier to sharpen and has a large following of devotees. Yet others lean toward a curved blade with the handles almost in-line with the blade such as the Barr Hewing Drawknife
We also carry mid-weight drop forged drawknives for small poles furniture or railing stock and smaller house logs; and heavy weight sizes for peeling house logs. You’ll find pictures and description for our many drawknives HERE.

If you experience tearing or jagged edges while peeling try peeling in the other direction. Often you have to peel toward knots. Additionally keep your blade sharp. Many people want to leave some of the inner bark on for a more “rustic” look. (This is often defined as “skip peeled”). Before you do, consider that the bark can harbor insects which can start chewing into your logs; bark can also act like a sponge holding moisture in contact with your logs; and it can eventually curl up and fall off taking with it any stain/finish you’ve applied and leaving your logs unprotected in those areas. You’ll probably be fine in a dry non-buggy area but think twice about leaving bark on in a moist/humid area where wood boring insects abound.
If you prefer the look of Appalachian style square hand hewn log homes try using an adze or broadaxe.
Adzes are available with both flat and curved blades as well as short and log handles. Short handled adzes are used with either one or two hands with the wood you’re working on located between knee and waist height. Long handles are often used when “straddling” your work on the ground or close to the ground. In effect you swing the adze between your legs. Some builders consider an adze the finishing tool to the broad axe. Others use it on it’s own. And still others might use a short handle curved adze to hollow out chair seats.
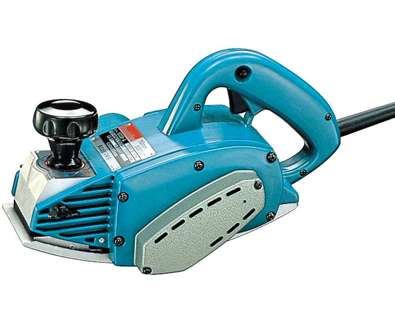 Another way to get that traditional ‘Adzed’ look with less effort is to consider using a Curved Base Planer. Popular with several handcrafted log home companies, it can be much quicker to train someone to get a quality look with the planer than to get someone in shape to do a good days work with an Adze.
Broad axes are similar in look to an axe with an extra wide blade. Handles are most often of mid to full length and grasped with both hands. You generally work standing to one side of the log with the flat side of the broad axe to the wood. The log or beam can either be on 
We carry hand-forged broadaxes from Sweden that can be either beveled on the left or right and that come with a straight or angled handle. This truly authentic method will give you a new appreciation of the log homes of yesteryear.

A mechanical method to remove bark employs the Log Wizard. This tool bolts to the end of your chainsaw bar and is powered by your saw chain. The two blades rotate on a drum and make quick work of peeling. The end result is similar to a drawknife effect. This tool can also rough shape logs (rough notch sharpen the ends for fence posts etc.). For added safety we normally suggest ordering with the cutterless ‘drive’ chain and a 16″ bar.
Water peeling is possible for wood that was cut in the spring and leaves your logs beautifully smooth. In this method you are removing the bark and a layer of wood down to the next intact winter growth ring using a pressure washing unit. The winter “ring” is incredibly hard compared to the growth area between the rings and some high-end builders prefer this method for that result. Conversely it’s more difficult to get a penetrating finish to “take” properly. The water pressure should be 500-1000 psi if you are using a regular nozzle and 2000-4000 + 
Pressure washing is more difficult to use if the logs have been heavily damaged by the logger because several layers of growth rings may have been damaged and it’s difficult to get one smooth layer as you keep “blasting” into a deeper layer where ever there is damage to the log. If you peel your logs this way keep in mind that any damages incurred in the building process will be very hard to hide.
Scribing your logs, timbers and trim boards

Scribers are used to transfer the shape of one log to another. This tool is indispensable when building a scribe-fit (chinkless) home. The double bubble or bulls-eye level attached to the scriber allows you to accurately transfer the irregularities of the lower log go the one above with a scriber pencil. By cutting along your scribed lines you can ensure that the logs will fit together tightly.
This procedure is also used by wooden boat builders and trim carpenters to transfer unusual shapes to the boards they’re working with.